Grout Cleaning

Welcome to my Work History archive where you will find detailed examples of the cleaning and renovation of Grout carried out in South Cumbria

Cleaning and Renovating Grout

The top layer of grout is porous and can absorb grease, dirt and limescale. Spillages such as wine, lemonades or greasy substances will cause marks and patches in the joints in the floor. Grout between wall-tiles particularly in damp areas like bathrooms will become dirty and unattractive as a result of Mould, Mildew and Limescale.

Mould is one of the most unsightly problems, which usually starts off in the wettest area of the room, this could be the bottom of the shower or bath, then starts to spread and if left unchecked could cover a large area of the wall.

Another common issue we find is a problem known as Grout Haze or Grout Smearing where a thin layer of grout has been left to set on the surface of the tile. Once grout has set it is difficult to remove.

Discolouration of grout joints in bath or shower areas due to continued use of acid formulated shampoos and soaps. This causes yellow orange and pink stains to the grout over even a short period of time. Whilst Grout Joints can be cleaned, badly stained grout may need to be re-coloured.

Protecting your grout in advance with a sealer will prevent most of these issues and although relatively unknown in the UK, protection awareness is growing. Sealing forms an invisible barrier between the grout and the surface, this will then protect your investment for years to come.

We have solutions for all the problems listed above and below you will find detailed examples of work we have carried out in the past to resolve many of these issues. It should give you some idea of what’s involved and what can be achieved with the right techniques and products.


Oyster Slate Floor Renovation Grasmere

Riven Oyster Slate Floor Renovation Grasmere

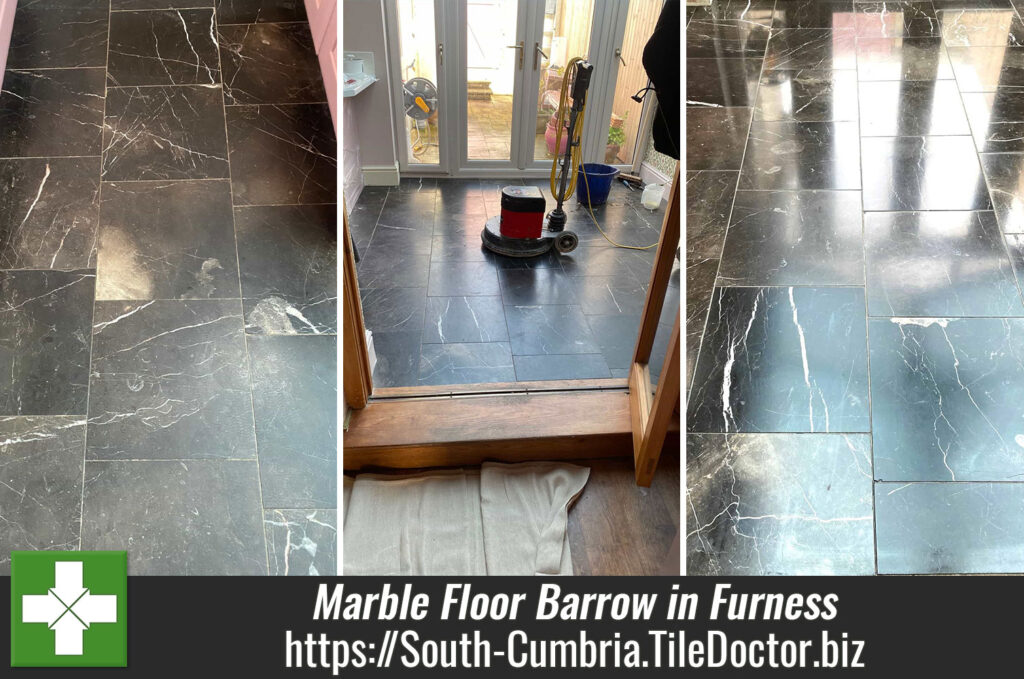
This Oyster Slate tiled floor installed at a property in Grasmere had become dull and uneven in appearance due to ground-in dirt. The floor was subject to heavy foot traffic from a large family and over time the sealer had worn down allowing dirt into the pores of the stone and leaving it looking permanently dull. Unhappy with its appearance the owner requested a thorough clean to restore the natural colour and texture of the slate and then seal the surface to protect it long-term while retaining a natural finish.

Oyster Slate Floor Before Renovation Grasmere

Before quoting I paid a visit to the property and conducted an initial inspection of the floor to assess porosity and condition. I also used the opportunity to measure the floor area which was quite large as it extended from the living room into the kitchen and adjacent utility.

From the inspection I was able to work out a renovation plan which fed into a detailed quote that included all the products needed to do the work. The quote was emailed over the client who was happy for the work to go ahead and a date was scheduled.

Cleaning an Oyster Slate Tiled Kitchen Floor

To get the floor clean and free of any remaining sealer a strong dilution of Tile Doctor Pro-Clean was sprayed onto the tiles and left to soak in for ten minutes. This gives the product time to work its way into the pores of the stone to digest the soiling and breakdown old sealers. The floor was then scrubbed using a rotary machine fitted with a coarse silicone brush that gets into the stone and grout to lift embedded grime from the riven surface and grout.

Oyster Slate Floor During Renovation Grasmere

The soiling was then rinsed off the floor and extracted with a wet vacuum. The Slate tile and grout were then inspected and any stubborn stains re-treated using the same process. Due to the size of the floor I worked in sections and once complete rinsed and extracted again to remove the remaining residues. A fan was deployed around the floor to increase drying times.

Oyster Slate Floor During Renovation Grasmere

Sealing an Oyster Slate Tiled Kitchen Floor

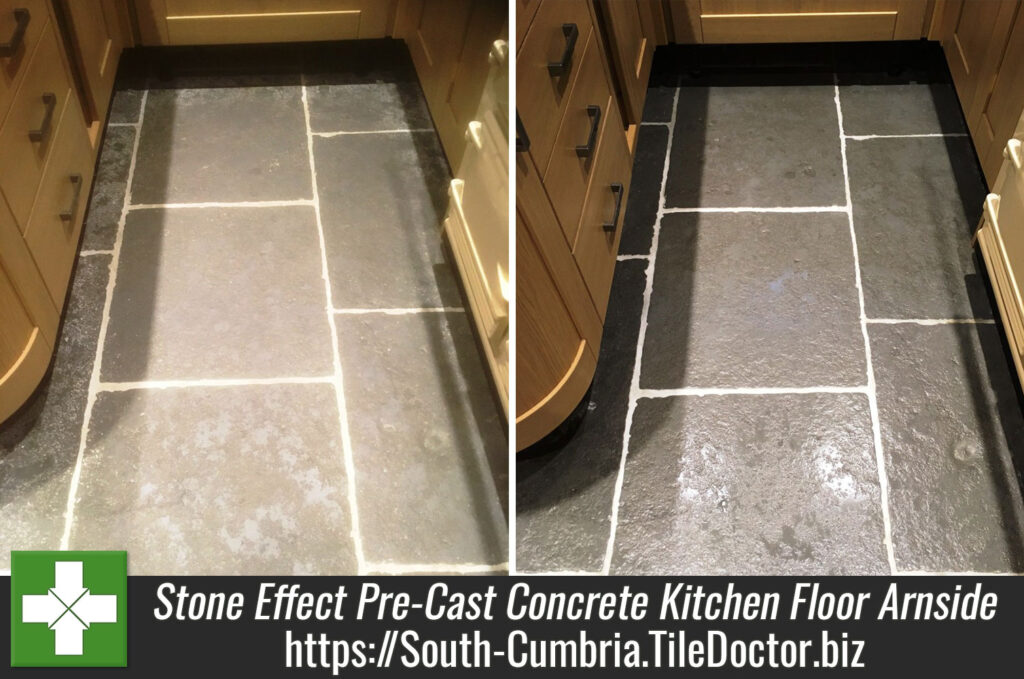
After leaving the floors to dry out fully overnight I returned the next day to apply a sealer which would add colour and an appealing finish to the slate. For slate I recommend using Tile Doctor Seal & Go which adds an appealing subtle satin finish to the stone. Four coats were needed to fully seal the stone and protect it from ingrained dirt and staining.

The floor now has a clean, even appearance with the natural character of the Oyster Slate fully revealed. The new seal provides durable protection, easier maintenance, and improved resistance to moisture and everyday wear.

Oyster Slate Floor After Renovation Grasmere Oyster Slate Floor After Renovation Grasmere

The slate floor looked so much better once complete, and the clients were very happy with the improvement. The new sealer will also keep dirt on the surface where it can be easily cleaned away for which I recommended using Tile Doctor Neutral Tile Cleaner and a two-chamber mop.


Professional Renovation of an Oyster Slate Tiled Kitchen in South Cumbria

Riven Oyster Slate Floor Renovation Grasmere Read More »

Flagstone Floor Renovation Ulverston Barn Conversion

Restoring a Rich Finish to a Tired Flagstone Floor in Ulverston

A customer from Ulverston was nearing the end of a house refurbishment and got in touch regarding the renovation of a Flagstone floor. A lot of contractors had been through the property and the stone was not looking its best. Happy to assist I arranged to visit the property and provide advice on its restoration.

I went over to survey the floor and could see it was suffering from heavy ground-in soiling. The stone had lost its colour and now looked dull and lifeless; the grout was also heavily soiled with ingrained dirt. We discussed the floor in detail and I recommended a deep clean to remove all the dirt and then applying a sealer to restore colour to the stone and prevent ingrained dirt.

Flagstone Floor Before Renovation Ulverston Barn Conversion

After measuring up I worked out a detailed quote and emailed it across to the customer for their review. Happy with quote I got the go ahead to restore the floor and agreed a date.

Deep Cleaning a Tired Flagstone Floor

To get the stone clean it was sprayed with a strong dilution of Tile Doctor Pro-Clean and this was left to soak in for a good fifteen minutes to give it time to start breaking down the ingrained dirt. The floor was then scrubbed with a rotary machine fitted with a coarse carborundum brush which lifts the dirt out of the stone and grout. The soiling was then rinsed off the floor and extracted with a wet vacuum.

Flagstone Floor During Renovation Ulverston Barn Conversion Flagstone Floor During Renovation Ulverston Barn Conversion

To further clean the Flagstones and strip off old sealers and remaining surface residues the floor was further treated with a strong dilution of Tile Doctor Remove and Go. This time the solution was scrubbed into the stone using a coarse 200-grit diamond burnishing pad to refine the appearance of the stone.

After rinsing and extracting again the stone was given an acid rinse using Tile Doctor Acid Gel. This neutralises the stone after the use of alkaline cleaners and further cleans the stone to remove grout smears and old mineral deposits to further refine the surface, improving clarity and tone within the stone

After a final review of the stone to spot clean any stubborn areas, it was given another rinse and dried as much as possible using the wet vacuum.

Sealing a Flagstone Floor

The floor was left to dry out overnight and work resumed the next day to finish the stone with the application of a sealer. First however the floor was checked for moisture, applying sealer to damp stone can result in a patchy appearance so best avoided.

The results were fine so work started to apply the first of what would be two coats of Tile Doctor Colour Grow. This sealer is an impregnator that soaks in the stone adding protection from within, this ensures dirt remains on the surface where it can be easily cleaned away. Another feature of Colour Grow, as its name suggests, is to enhance and deepen the colour and features in the stone.

Flagstone Floor During Sealing Ulverston Barn Conversion

Once complete the flagstones were restored to a rich, natural finish with improved colour depth and a far more uniform appearance. The surface is now protected and significantly easier to maintain.

Flagstone Floor After Renovation Ulverston Barn Conversion

For aftercare I recommended Tile Doctor Neutral Tile Cleaner which will clean the floor without impacting the sealer which can be a problem with many of the stronger products you find in supermarkets.


Professional Restoration of a Black Flagstone Basement in Cumbria

Restoring a Rich Finish to a Tired Flagstone Floor in Ulverston Read More »

Limestone Tiled Floor Renovation Levens Village

Restoring the Appearance of Tired Limestone Tiled Flooring in Levens Village

If you have a Limestone Tiled floor like the one below at a property in the village of Levens then the following article should be of interest. Natural stone floors like Limestone are porous in nature and need to be sealed to prevent dirt from becoming ingrained. In this case the tiles were last sealed eleven years ago and with the sealer now worn away they were becoming increasingly difficult to keep clean and looked dull and heavily worn.

Limestone Tiled Floor Before Cleaning Levens Village

The husband had tried to clean the floor with an aggressive product he found in the supermarket however this ended up marking the Limestone. This is not surprising as we find many floor cleaning products you find in supermarkets are acidic and will damage calcium-based materials like Limestone, so best avoided. If you read the label often you will find they are only recommended for use on Ceramic tile or Vinyl.

In a panic and concerned the floor had been permanently damaged he contacted Tile Doctor for a solution. We work on stone floors all the time so were able to provide re-assurance the problem could be resolved and not only that the floor could look amazing with the right treatment. Happy to let us to sort it out we were asked to step in.

Cleaning and Burnishing Limestone Tiled Flooring

At Tile Doctor we have developed a tried and tested system for restoring the appearance of natural stone. It involves the application of a set of burnishing pads that are made from industrial diamonds and graded from a coarse 400-grit to a very fine 3500-grit.

The pads fit a rotary floor machine and along with water for lubrication are run over each tile several tiles rinsing away the fine slurry that is generated after each pad and extracting with a wet vacuum. The process starts with the coarse 400-grit pad which removes etching, coatings and other contaminates. This pad does a good job of removing damage and cleaning up the stone but leaves it looking dull with a matt finish.

Limestone Tiled Floor Before Cleaning Levens Village Limestone Tiled Floor During Cleaning Levens Village

To bring back the finish, finer grit diamond Burnishing pads are then applied in sequence from 800 to 1500-grit rinsing and extracting after each pad. These finer pads are the first steps in rebuilding the polish on the Limestone slowly restoring its appearance. The pads can struggle to get into the corners and edges of the floor to these are done with smaller pads of the same grade fitted to a handheld machine.

After this work, I started on the grout lines which were scrubbed by hand using Tile Doctor Pro-Clean which is an alkaline cleaner and will not upset the Limestone. I find it best to do this work by hand as the pads can struggle to reach into the recesses of the grout line. After a final rinse with clean water which was then extracted with the wet vacuum the floor was left to dry off overnight assisted with a couple of floor blowers.

I called back the next day and started work by checking the stone and grout was nice and dry and ready for a final polish using the very fine 3500-grit diamond pad. This pad brings up the polish on the floor even further and is applied using a tiny amount of water from a spray bottle which aids in the final polish.

Sealing a Polished Black Limestone Dining Room

Once the whole floor was polished including all the corners and edges it was time to start applying the sealer. I opted to use Tile Doctor X-Tra Seal for this which is an oil-based breathable sealer that soaks into the pores of the stone protecting it from within and ensuring any dirt remains on the surface where it can be easily cleaned away. The floor was then buffed with a white pad to remove and excess sealer and bring up the shine even further.

The sealer will provide long term protection to the Limestone and once finished the natural colour, and character had been restored to the floor. My client was over the moon with the finish and said it looked like a new floor.

Limestone Tiled Floor After Burnishing Levens Village

Before leaving I made sure to spend time discussing future cleaning and recommended, they use Tile Doctor Stone Soap going forward. This is a mild but effective cleaner which will help maintain the patina on the stone.

Limestone Tiled Floor After Burnishing Levens Village


Professional Renovation of Limestone Flooring in South Cumbria

Restoring the Appearance of Tired Limestone Tiled Flooring in Levens Village Read More »

Terracotta Tiled Floor Renovation Hawkshead

Terracotta Tiled Flooring Stripped and Sealed in Hawkshead

The client from Hawkshead had used Tile Doctor previously to renovate a Terracotta tiled floor. Now eleven years later the floor needed attention again and so I went over to the property to survey the tiles and get a good understanding of any issues and requirements.

I went out to the client to assess the floor and could see the sealer had all but gone and dirt was becoming ingrained in the Terracotta. It turns out the client had been using flash floor cleaner which has a PH over 12 making it a strong alkaline and similar in PH to our own product Remove and Go which we use for stripping sealers off floors.

Terracotta Floor Before Cleaning Hawkshead

After discussing the floor in detailed I proposed stripping the floor back completely to its pre-seal state, deep cleaning to flush out the ingrained dirt then and re-sealing to bring the tiles back to their best condition. I worked out a detailed quote which was accepted and a date set for the work to start two weeks later.

Cleaning a Terracotta Tiled Hallway Floor

Before stripping and cleaning time was spent adding protection to the kitchen island, skirtings, and exposed surfaces. This is necessary to prevent moisture and chemical exposure soaking into the woodwork which can result in warping and staining.

Next a strong dilution of Tile Doctor Pro-Clean was sprayed across the entire floor and after leaving it to soak in for ten minutes scrubbed into the tile and especially the grout. This product is an effective Tile and Grout cleaner and served as an initial clean to the grout and Terracotta which is very porous.

Terracotta Floor During Cleaning Hawkshead Terracotta Floor During Cleaning Hawkshead

The floor was inspected and there was still evidence of sealer in the less used areas of the floor as well as deeply ingrained grime. To deal with these problems Tile Doctor Remove and Go was sprayed onto the problem areas and left to soak in as before. After ten minutes the solution was agitated using a deck brush and then worked into the Terracotta using a rotary scrubber fitted with a black pad. Each part of the floor was scrubbed five to six times to remove any remaining sealer and release the dirt. Afterwards the floor was rinsed with water and the soiling extracted with a wet vacuum and at this point you could really see the true colours of the Terracotta.

Next step was to give the tiles and acid wash using Tile Doctor Acid Gel which applied to the tiles and diluted with water whilst being brushed into the tiles. This removes residues, mineral deposits, old grout smears and remaining contaminants. Being acidic it neutralises the floor after the alkaline cleaning products used earlier. After being allowed to dwell briefly it was then removed using the wet vacuum. The floor was then rinsed with water and extracted again to remove any trace of product prior to the next step of sealing.

Sealing a Terracotta Tiled Hallway Floor

I left the floor to dry out overnight with multiple floor fans to accelerate drying and returned the next day to seal the floor with Tile Doctor Colour Grow. This product is an impregnator that soaks into the pores of the Terracotta and acts as a barrier to prevent dirt from becoming ingrained there. It also contains a colour enhancer that really works well on Terracotta to bring out the natural red and orange colours in the tile.

Once that Colour Grow had dried which leaves a matt finish, I completed the sealing by topping it off with five coats of Tile Doctor Seal and Go which adds a nice subtle shine to the tile. When complete the floor looked so much better with improved colour and depth and a lovely silky appearance.

Terracotta Floor After Cleaning Sealing Hawkshead Terracotta Floor After Cleaning Sealing Hawkshead

The outcome was very satisfactory and the client was extremely pleased with the result and the floor was ready in time for Christmas guests. For aftercare I recommended Tile Doctor Neutral Tile Cleaner which is a mild yet effective cleaning product that won’t affect the sealer.


Professional Renovation of a Terracotta Tiled Flooring in South Cumbria

Terracotta Tiled Flooring Stripped and Sealed in Hawkshead Read More »

Polished Black Marble Floor Polished in Furness

Polished Black Marble Foor Polished in Barrow in Furness

This client from Barrow in Furness contacted Tile Doctor about their polished black marble floor which had been installed 20 years ago. Its polished appearance had diminished with use over that time, and they had wasted money on different products sourced from DIY shops and the internet to rectify it.

Polished Black Marble Floor Before Cleaning Barrow in Furness

Many of these products were unsuitable for this type of tile and as such the top surface was quite tacky to walk on and had done nothing to improve its appearance. Happy I could resolve the problem they accepted my quote to re-polish the floor and a date was agreed to commence the work.

Cleaning a Polished Black Marble Dining Room

My first task was to protect the woodwork by applying a bead of clear waterproof mastic between the wood and the floor, this prevents water being soaked into the wood through capillary action, this can cause water staining and worst-case blow MDF skirting and doors.

Once done work started on polishing the marble floor using a 200-grit 17-inch diamond pad fitted to a rotary floor machine. This pad removes encrusted sealers, old polish and other products that were upsetting the stone finish. Applied with water for lubrication this pad does a good job of cleaning up the stone but leaves it looking dull with a matt finish.

To bring back the finish, finer grit diamond Burnishing pads are applied in sequence starting with 400 then 800 and 1500-grit. These pads clean and rebuild the polish on the Marble slowly brings the stone back to life again. The floor is rinsed off with water after each pad and the soiling extracted with a wet vacuum. The edges were then completed with a small handheld machine using smaller pads of the same grits.

After this work, I started on the grout lines which were scrubbed by hand using Tile Doctor Pro-Clean which is an alkaline cleaner and will not upset the marble. I find it best to do this work by hand as the pads can struggle to reach into the recesses of the grout line.

Polished Black Marble Floor During Cleaning Barrow in Furness Polished Black Marble Floor During Cleaning Barrow in Furness

A final rinse with clean water which was then extracted with the wet vacuum and the floor left to dry off overnight.

I called back the next day and started work by checking the stone and grout was nice and dry and ready for a final polish using a 3000-grit diamond pad. This pad brings up the polish on the floor even further and is applied using a tiny amount of water from a spray bottle which aids in the final polish.

Sealing a Polished Black Marble Dining Room

Once the whole floor was polished including all the corners and edges it was time to start applying the sealer. With this being a Black Marble floor with more than a few marks on it from the wear and tear over the last twenty years, I opted to use a sealer normally designed for outside areas called Tile Doctor X-Tra Seal. This is an oil based breathable sealer that soaks into the pores of the stone protecting it from within and ensuring any dirt remains on the surface.

Polished Black Marble Floor During Sealing Barrow in Furness

We don’t normally recommend X-Tra Seal for polished surfaces as the oil takes a lot to cloth off, however in this case I felt the extra work would be justified as the oil works well on Black stone.

Polished Black Marble Floor After Cleaning Barrow in Furness

Once done the Marble tiles were transformed by the work much to the relief of the owner who had really struggled to maintain the floor. Before leaving I made sure to spend time discussing future cleaning and recommended, they use Tile Doctor Stone Soap going forward. This is a mild but effective cleaner which helps maintain the patina on the Marble.


Professional Renovation of a Polished Black Marble Floor in South Cumbria

Polished Black Marble Foor Polished in Barrow in Furness Read More »

Stone Effect Pre-Cast Concrete Kitchen Flooring Deep Cleaned in Arnside

Stone Effect Pre-Cast Concrete Kitchen Flooring Deep Cleaned in Arnside

The stone floor in these pictures are in fact pre-cast concrete tiles created to emulate Limestone flagstones laid in a Kitchen in Arnside. You can’t beat the natural beauty of Limestone but these concrete tiles do give the Kitchen that rustic look the customer sought. The odd thing is, it’s actually less expensive to buy real Limestone these days as Pre-cast concrete is not a cheap product.

Stone Effect Concrete Kitchen Flooring Before Cleaning Arnside Stone Effect Concrete Kitchen Flooring Before Cleaning Arnside

Unfortunately, in this case, the concrete had been smeared with Ivory Grout during installation and the tiler had failed to remove it after grouting and this had dulled the look of the tile. The customer was led to believe by the Tiler that the off-white colour was indeed part of the stone and had put up with it for several years before we were called out.

Cleaning a Damaged Flagstone Tiled Floor

First of all we conducted a test clean to make sure our usual cleaning system would work as well on pre-cast concrete. I was aware that this type of product has a colour dye added to it which does seem to lose colour over the years and also can lose quite a bit of this dye once we start cleaning with strong chemical’s. Not wanting to risk any depreciation in the colouring I opted instead for the application of a set of Tile Doctor Burnishing pads. The pads are encrusted with industrial Diamonds and come in different grits from coarse to fine and I found that not only did the process remove a lot of the of White grout haze left by the tiler but also gave us a good start to the cleaning process without losing any more of the colour Dye.

The customer has specified they were keen for the floor to have more of a sheen finish, so we finished the cleaning with the rest of the Diamond pads finally ending on the super fine pad. We had to do some edging work where the circular pads could not reach but apart from that the pre-cast concrete responded well to this treatment as you will see on the before and after pictures.

Sealing a Flagstone Tiled Floor

The next day we called back to seal the Kitchen floor to protect it from staining, something that is more than likely in a Kitchen. For this we used a couple of coats of Tile Doctor Colour Grow which not only protects by soaking into the pores of the tile but also restores a lot of the colour that had previously been lost.

Stone Effect Concrete Kitchen Flooring Before Cleaning Arnside Stone Effect Concrete Kitchen Flooring Before Cleaning Arnside

For aftercare I explained to the customer that sealers do wear off over time and so to get maximum life out of the sealer they should clean the floor with a pH Neutral Cleaner like Tile Doctor Neutral cleaner. It’s designed for cleaning sealed tiled floors and it won’t affect the colour dye or the Sealer we have applied unlike stronger products will eat away at the sealer over time. Additionally, pre-cast concrete like Limestone is Acid Sensitive and as such products like certain types of the Cillit-Bang range cannot be used on a floor like this as it will cause surface damage.


Restoration of a Damaged Flagstone Tiled Floor in South Cumbria

Stone Effect Pre-Cast Concrete Kitchen Flooring Deep Cleaned in Arnside Read More »

Shower Room Tile and Grout Restoration in Kendal

Shower Room Tile and Grout Restoration in Kendal

One of the first issues people have with shower rooms is the Silicone needs to be replaced, even a good quality Silicone like Mapei Ultra-seal which is fully waterproof and stain and mould resistant can still succumb to persistent damp issues. In fact it can get so humid in these areas the warm atmosphere is akin to a tropical rain forest.

To avoid the build-up of mould I recommend you rinse the wall tile and silicone down with plain water from the shower head after every shower and then leave the tiles to dry. Open the window and door to let out the warm condensation and after 5 to 10 minutes partly close the window (to the security setting) and then partly close the door, this then normalizes the room temperature thus inhibiting mould spores from blooming, as mould wont start to Spore on a cold room.

Shower Room Before Restoration Kendal

The pictures were taken from a shower room at a house a few miles up the road in Kendal where mould had caused a lot of staining to the silicone sealant and to the tile and grout both inside the shower cubicle and in the bathroom itself. There were also a couple of loose tiles around the base of the shower cubicle which needed to be re-fixed.

Shower Cubicle Before Restoration Kendal

Cleaning Ceramic Tile and Grout

We started by spraying the tile and grout down with Tile Doctor Pro-Clean which is a strong alkaline cleaner, spraying it on mixes it air which helps it to stick to Vertical surfaces allowing it to get to work on the dirt. We left it to dwell for ten minutes before scrubbing it in by hand using a stiff grout brush; this process certainly improved the grout but unfortunately it had become too badly stained to be satisfactory so we decided to recolour the grout using a white grout colourant.

Once the shower tile was dry the loose tiles were removed and the damp plaster board behind chopped out and replaced. The tiles were then cleaned up, fixed back into position, then grouted and the silicone sealant around the base of the shower cubicle was stripped out and replaced with new.

Shower Cubicle During Restoration Kendal Shower Cubicle During Restoration Kendal

Colouring Grout

One to two coats of white colourant were applied to the grout throughout the shower cubicle and shower room in order to get a uniform appearance and this final touch completed the transformation.

Shower Cubicle After Restoration Kendal

The other advantage of these particular colourant products is that they are epoxy based and form a barrier of the grout preventing future staining and making it very easy to clean going forward.

Shower Cubicle After Restoration Kendal

I think you will agree bathroom now looks like it was recently installed.


Restoring the Appearance of Shower Cubicles in South Cumbria

Shower Room Tile and Grout Restoration in Kendal Read More »

Changing the Grout Colour used on Porcelain tiles in Kendal

Changing the Grout Colour used on Porcelain tiles in Kendal

A customer in Kendal requested that the colour of grout installed on 20m2 newly laid textured Porcelain tile floor was changed; the tiler had used a Sandstone coloured grout and they were not happy with the colour or the grouting in general which looked patchy. I recommended the use of an epoxy Grout Colouring product that re-colours, seals and rejuvenates existing grout joints and comes in twelve different colours and after showing the customer the different colour options they picked Charcoal Grey.

Textured Porcelain Tile with Limestone Grout in Kendal

Applying Grout Colourant

I did a test area so they could see how it might look under the lights which went well and so I started to apply the grout colouring to the whole kitchen floor completing small areas until the entire floor was covered and taking care not to get any on the Porcelain tile as the textured surface makes it difficult to remove and requires the use of an white abrasive scouring pad. Normally you have to use a Pre-Treater product on the grout before Grout Colouring however this grout was new and so this step was unnecessary.

Textured Porcelain Tile with Charcoal Grey Grout in Kendal Textured Porcelain Tile with Charcoal Grey Grout in Kendal

This job took me one day and only required one tube of Grout Colourant. The owner was extremely happy with the result will now have a fairly maintenance free tiled floor as Porcelain tiles are very hard wearing and the epoxy grout colourant acts as a barrier and therefore unlikely to discolour.

To source similar Quarry tiles visit www.KendalTileandStone.co.uk

Changing the colour of grout in Kendal

Changing the Grout Colour used on Porcelain tiles in Kendal Read More »

=================================

South Cumbria Tile Doctor

================================= Read More »

Scroll to Top