tile cleaning

Victorian Tiled Floor Renovation Ulverston

1860s Victorian Mansion Flooring Restored in Ulverston

Detailed below is the restoration of several original Victorian tiled floors at an older building in Ulverston. The large property was being fully redeveloped after being vacant and unoccupied for the last fourteen years which left it in a bad state of repair.

Damaged Victorian Floor Before Restoration Ulverston

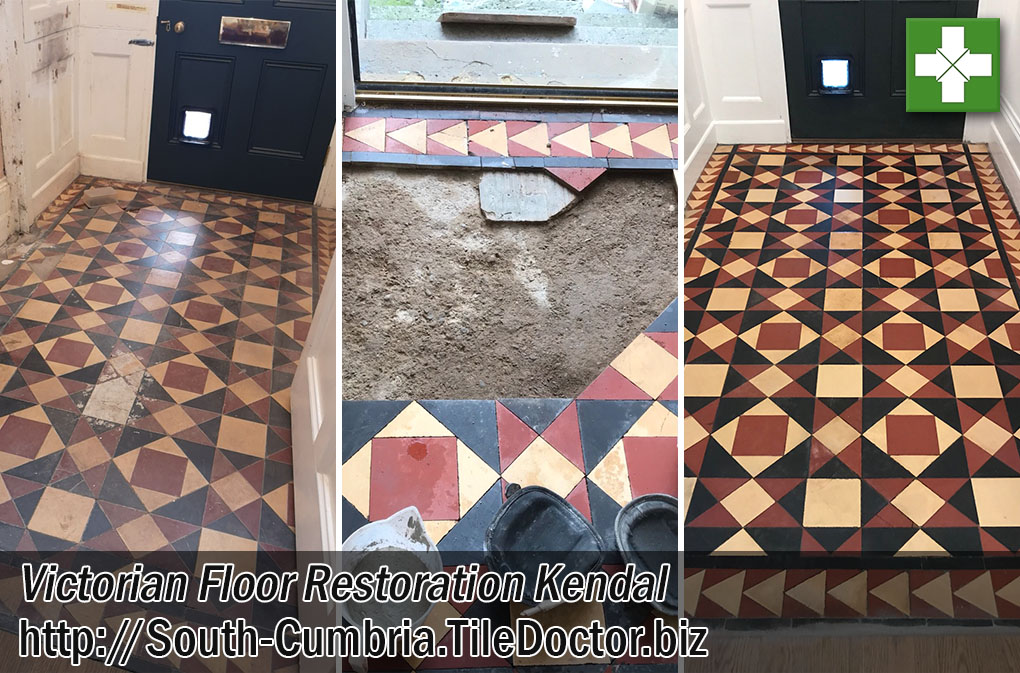
The development company had already spent a significant amount of time and money turning this 1860s Victorian Mansion into 7 modern apartments. Fortunately, they had decided to keep as much of the original features as possible which included the amazing Victorian Floor tiling in the main hallway.

Damaged Victorian Floor Before Restoration Ulverston

Physically the Victorian tiles were in good condition apart from two areas near the doors where some damage had been done to them in the past. The area measured 50m2 approximately so I could see it would need two Tile Doctors over four days to repair the damage and fully restore the tiles.

Damaged Victorian Floor Before Restoration Ulverston

Deep Cleaning a 50m2 Victorian Tiled Hallway

The first day was mainly about deep cleaning the whole area using Tile Doctor Remove and Go worked into the floor using a 200-Grit Diamond pad fitted to a buffing machine. This process releases sediment, dirt and old coatings from the tile which is then extracted using a wet vacuum. It’s worth considering that you can’t really clean these types of tiles properly without a wet vacuum, a mop and bucket simply doesn’t cut it also mopping an area this size simply takes too long.

The next stage of the cleaning process was to give the floor an acid wash using another Tile Doctor product called Grout Clean-up which has an acidic base. This process neutralises the alkaline cleaning product used earlier and microscopically etches the clay tile to achieve a better boned with the sealer which will be applied later. This acid also helps in the cleaning process and will counter any efflorescent salt issues that are common problem with floors of this age. Once removed with the wet vacuum the floor is rinsed and extracted again to ensure any residue is removed and the floor is as dry as possible.

Repairing a Victorian Tiled Hallway

Whilst the main floor was left to dry, we proceeded to work on the damaged and missing tiles. This is one of the advantages of using a Tile Doctor for work like this as you will find other tile cleaning companies won’t offer a Tiling service. I must say thought we only offer tiling as part of a larger “Restorative Cleaning” project which is something we specialise in.

Damaged Victorian Floor Before Restoration Ulverston Damaged Victorian Floor During Restoration Ulverston Damaged Victorian Floor After Restoration Ulverston

Sealing a 50m2 Victorian Tiled Hallway

Once the Tiling was completed and the Tiles had dried out (24 hours later) we returned to seal the floor. For this a single coat of Tile Doctor X-Tra seal was applied, this was chosen for its durability and the fact that its fully breathable which is important feature for floors of this age without a damp proof membrane. It’s an oil resin formula which makes it thicker than a solvent-based sealer so in most cases only one coat is required, it can also be used externally.

Damaged Victorian Floor After Restoration Ulverston

It takes several hours for the sealer to fully dry and around 24 hours to fully cure so the photographs I took don’t really do the sealer justice. Unfortunately, I couldn’t wait around that long.

Damaged Victorian Floor After Restoration Ulverston


Professional Restoration of Victorian Mansion Flooring in South Cumbria

1860s Victorian Mansion Flooring Restored in Ulverston Read More »

Victorian Tiled Entrance Floor Before and After Restoration in Prizet Kendal

Restoration of a Victorian Tiled Floor in Prizet, Kendal

The photos below are of a 1.7 metre by 3 metre Victorian tiled floor at the entrance to a property in Prizet, south of Kendal. As you can see the hallway and porch was in a poor state due to old age and neglect. Some tiles were cracked, missing and stained with cement, and what I suspect was carpet adhesive. One of the tiles had a four-inch hole down to the cellar where a soil pipe was installed previously when the room was used as a downstairs W.C. The client was doubtful that we would be able to restore the floor but thought it would be worth contacting us just in case.

Victorian Tiled Entrance Floor Before Rebuild Prizet Kendal Victorian Tiled Entrance Floor Before Rebuild Prizet Kendal

I visited the property to take a proper look and found their description of the floor was accurate and clearly overdue some serious attention. I also noticed that some point in the past cracked tiles had been removed and replaced with cement. However, I was confident the floor could be restored and gave them a price for the restoration which they were happy to proceed with.

Victorian Tiled Entrance Floor Before Rebuild Prizet Kendal

Repairing a Victorian Tiled Hallway Floor

Work started by rebuilding the worst part of the floor which would require the services of my partner Russell. This involved removing the existing tiles, then preparing the concrete base which needed to be level and smooth before we started tiling.

Victorian Tiled Entrance Floor During Rebuild Prizet Kendal

We had previously managed to source very similar tiles which would be needed to replace those that were missing or damaged. Once the floor was prepped, the replacements were cut to fit taking care to ensure they matched the original pattern. Once cut they were fixed in place with flexible adhesive. We recommend the use of flexible floor adhesive on old floors due to the potential movement and the flexible floor adhesive doubles up as a grout as well. The floor was then left overnight to dry.

Victorian Tiled Entrance Floor During Rebuild Prizet Kendal

Deep Cleaning a Victorian Tiled Hallway Floor

On day two the floor was deep cleaned using a 100-grit resurfacing pad followed by a 200-grit pad and then a 400-grit burnishing pad. The pads are attached to a rotary machine and the floor is rinsed with water and the soil extracted with a wet vacuum in-between.

We then finished the clean with an acid rinse using Tile Doctor Grout Clean Up. This is needed to remove the cement stains from the surface of the Victorian tiles and neutralise any potential efflorescent salt issues in the tiles. Another advantage is the acid slightly etches the tiles making a better bond with the sealer.

The floor was given another rinse with water and then the wet vacuum was pressed into surface again to extract the fluids and get the floor as dry as possible before leaving for the day.

Sealing a Victorian Tiled Hallway Floor

We returned on the third day and first checked the floor was fully dry using a moisture meter. Four coats of Tile Doctor Colour Grow were applied to achieve a strong enduring seal that will cope well with the traffic coming through the entrance.

Colour Grow is a colour intensifying sealer that provides durable surface protection to the tiles, but at the same time allows the surface to breath which is important in a floor such as this where no damp proof membrane is present. The results speak for themselves I was particularly happy with the area where we had repaired the hole, it was barely noticeable.

Victorian Tiled Entrance Floor After Rebuild Prizet Kendal

Many thanks to my customer for sending over the before photos and for leaving the following testimonial.

“Great restoration job done on our Victorian hall and porch tiles including replacing broken tiles and cleaning. Now looking better than ever. Russell was very professional and knowledgeable. Nicola F. Kendal”


Professional Restoration of a Victorian Tiled Hallway in South Cumbria

Restoration of a Victorian Tiled Floor in Prizet, Kendal Read More »

Victorian Hallway Before After Cleaning in Ulverston

Victorian Tiled Floor Cleaned and Sealed in Ulverston

Ulverston is one of several historic market towns in Cumbria which has some excellent views of Morecambe Bay and the Southern Lake District. It is also home to some lovely old properties, including one that I visited recently to provide some repairs, cleaning and sealing for a Victorian tiled floor.

Although the floor was in good condition overall, the tiles were starting to loosen in some areas because the grout had come adrift and needed to be replaced.In fact, several tiles had broken as a result of this and so they would need to replaced too.

Victorian Hallway Before Cleaning in Ulverston Victorian Hallway Before Cleaning in Ulverston

Cleaning a Victorian Tiled Floor

As I’ve mentioned, the floor had been well maintained, but I opted in any case to give the tiles a routine clean with our reliable high alkaline product, Tile Doctor Pro Clean, scrubbed in using a pad fitted to a rotary machine. This helped to remove any debris and dirt left over on the tiles.

After the initial clean I proceeded to replace the broken tiles with matching reproduction Victorian tiles, as well as the grout in the areas where the tiles had loosened.

Sealing a Victorian Tiled Floor

After finishing the cleaning and repair processes, it was time to seal the floor with a combination of sealers.

To do this I firstly applied one coat of Tile Doctor Colour Grow, which is an impregnating, colour intensifying sealer. We find that by applying a base coat of Colour Grow we can lock out the damp that can come through from underneath as many old floors don’t have damp proof membranes fitted, unlike many modern floors. What’s more, acrylic polymer sealers such as Tile Doctor Seal and Go do not respond well to a damp environment.

Once the Colour Grow had been applied and had dried completely, I applied five thin coats of Seal and Go to add further protection and a quality sheen finish. This sealer is also fully breathable and allows Vapour Moisture Transmission (VMT).

Victorian Hallway After Cleaning and Sealing in Ulverston Victorian Hallway After Cleaning and Sealing in Ulverston

The finish was exactly what the customer was looking for and they were very happy with the overall restoration of the floor. Another satisfied customer!


Professional Tile Repairing, Cleaning and Sealing for a Victorian Tiled Floor in Ulverston

Victorian Tiled Floor Cleaned and Sealed in Ulverston Read More »

Shower Cubicle in Grange ove Sands Before After Cleaning

Shower Cubicle Refreshed in Grange-over-Sands, Cumbria

Grange-over-Sands is a quaint little town on the Morecambe bay, roughly halfway between Barrow-in-Furness and Kendal in Cumbria. I was recently contacted by a property owner in the area who had heard about Tile Doctor services and was keen to have us restore their tiled shower cubicle which, as you can see from the photos below, had staining and mould on the ceramic tile, grout and silicone sealant.

Shower Cubicle in Grange-over-Sands Before Cleaning

The shower cubicle was looking far from inviting and well in need of a good deep clean. I agreed a quote for cleaning and recolouring of the grout, and was soon on my way to the property to carry out the work.

Shower Cubicle in Grange-over-Sands Before Cleaning

Cleaning and Recolouring a White Tiled Shower Cubicle

I started by cleaning the dirty grout with Tile Doctor Mould Away, which is a fast and effective formula for the removal of mould from silicone and grout. I sprayed the product onto the tile and grout and left it to soak in for five minutes, before scrubbing the area with a stiff brush. I then rinsed the area with water, and repeated the process until the mould and staining had completely disappeared.

To guarantee the overall appearance I had agreed with the owner to apply a grout colourant to the grout. For best results, we recommend a pre-treater is applied to the grout first as it helps bond the grout colour to the Grout. The pre-treater was applied then the whole cubicle was rinsed.

The next step was to carefully strip out the old silicone sealant from around the base of the cubicle using a sharp blade.

Colouring Grout in a Shower Cubicle

The grout needs to be dry to take the colourant so after cleaning and pre-treating I dried the grout with a heat gun on a low setting.

Once I was happy the grout was dry I started the recolouring process using a White colourant from the Tile Doctor range which has ten popular colours to choose from including Charcoal Grey, Cappuccino and Black. This would ensure the grout matched nicely with the rest of the cubicle.

The colourant not only restores the colour, it also rejuvenates and seals the grout joints. The lastly step was to apply fresh white silicone around the base of the cubicle.

Shower Cubicle in Grange-over-Sands After Cleaning

I think you will agree from the photos of the finished result the whole cubicle looks much fresher and that it would be difficult to tell the difference from a new installation.

Shower Cubicle in Grange-over-Sands After Cleaning


Professional White Tiled Shower Cubicle Restoration in Grange-over-Sands

Shower Cubicle Refreshed in Grange-over-Sands, Cumbria Read More »

Indian Limestone Patio Windermere Before After Cleaning

Green Indian Limestone Patio Treated for Heavy Staining in Windermere

This patio, at a house in Windermere was made of fantastic Green Indian Limestone that despite sounding exotic is widely available in tile shops and building yards. But while it is a very good quality stone, it doesn’t always make for a good patio tile. Tiled patios are rarely easy to keep clean, especially if they are made of a sensitive stone, like Limestone. Over time, damage from weather and other environmental elements can leave these sorts of patios in really poor shape.

Indian limestone patio Windermere before cleaning

The area at this property was covered in outdoor shrubs and trees, including Rhododendrons, which are prone to shedding their leaves. The leaves had intermittently fallen onto the acid-sensitive Limestone and, since the leaves are actually slightly acidic, they can leave some quite deep marks. Other trees with can have acidic leaves include Japanese Maples and Azaleas. In this case, fruit berries from Rowan trees had also dropped onto the patio and crushed underfoot, leaving stains they had proven very difficult for the customer to remove.

Indian limestone patio Windermere before cleaning

In fact, the customer was at the point of giving up on the patio. Power washing was having limited success, failing to remove the deeply embedded marks left by the leaves and berries, amongst other general wear and tear. Thus the customer decided to turn to Tile Doctor for a professional cleaning service.

Cleaning a Stained Indian Limestone Patio

A year ago, this job would have been a challenge, but Tile Doctor recently bought out a product called Oxy Gel that proved to be an excellent cleaning product in this particular situation. Oxy Gel is a heavily concentrated alkaline cleaner in a gel form so it’s easy to handle. I applied this to the Limestone and left it to dwell for about 20-30 minutes to neutralise the acidic staining, before power washing and extracting the waste water.

A certain amount of manual cleaning with a wire brush was required to remove the particularly stubborn marks, including underneath the Rowan trees where the fruit berries were prevalent. As you can see, the problem was quite excessive in these areas, and without the Oxy Gel even we would have found this job too much of a challenge. We also removed the dirty cleaning water containing the remains of the Oxy Gel using a wet vacuum, as this may otherwise have contaminated the garden soil.

Indian limestone patio Windermere after cleaning

We didn’t seal the patio, as we don’t recommend sealing outdoor stone (although we will occasionally make an expectation with particularly sensitive Black Limestone). This is because external sealers generally can’t cope with exposure to acidic leaves and constant wet weather in the winter. What’s more, if the temperature falls below -5 degrees centigrade, the sealer will start to break up and crumble. As I suggested to the customer, it’s best to power wash patio tiles twice a year – once in spring and once again in late summer.

Indian limestone patio Windermere after cleaning

The results were absolutely fantastic considering the extent of the environmental damage. While such damages can’t always be avoided, this situation proves that with the right cleaning products and techniques, they can be reduced significantly. Needless to say, the customer was very happy with the transformation.


Deep Cleaning a Stained Indian Limestone Patio in the Lake District

Green Indian Limestone Patio Treated for Heavy Staining in Windermere Read More »

Red Sandstone Floor before after cleaning in Kirby Lonsdale

Red Sandstone Floor Restored in Kirby Lonsdale

The Red Sandstone flagstones at this property in the historic market town of Kirkby Lonsdale had been covered with carpet and underlay and to make matters worse it had a screed level laid on top of the stone to make the floor smoother to walk on before the carpet went down. The current owner of the property had discovered the floor under the carpet and was now keen on having it restored back to its former beauty as a period feature.

Red Sandstone Floor before cleaning in Kirby Lonsdale

Restoring Sandstone

Stone is difficult enough to restore with the conventional chemical approach as it is so instead we opted to use a full diamond pad cutting system which is designed to cut back the screed to the stone underneath. This involves applying a very coarse 50 grit Diamond pad, followed by a 100 Grit and so on to the 200 grit. As you can see from the results this not only removed the Screed/Self levelling compound but also revealed the true red colour of the Sandstone.

Sealing a Sandstone Tiled Floor

We had to leave to the stone to dry out for several days as the diamond system uses a lot of water to lubricate the process which can saturate the stone making it take longer to dry out. Once fully dry we applied three coats of Tile Doctor Colour Grow for a nice even matt finish, colour grow also accentuates the deep colours in the natural stone.

Red Sandstone Floor after cleaning in Kirby Lonsdale

I think you will agree; this was quite the transformation.


Old Sandstone Floor Renovated in South Lakeland

Red Sandstone Floor Restored in Kirby Lonsdale Read More »

Travertine Tiled Flooring After Cleaning Kirby Lonsdale

Travertine Tiled Floor Burnished and Sealed in Kirkby Lonsdale

Here’s a job I completed recently at a house in the tiny town of Kirkby Lonsdale, situated in the South Lakeland district of Cumbria. My client had a large area of Travertine tiled flooring that was in certain need of a deep clean and reseal.

Travertine Tiled Flooring Before Cleaning Kirby Lonsdale Travertine Tiled Flooring Before Cleaning Kirby Lonsdale

Additionally, the floor suffered from a number of naturally occurring holes in the Travertine. This can be quite a common problem with Travertine, due to the fact that it’s a softer material than some types of stone and I’ve often heard of holes opening up in Travertine floors over time due to the use of acidic cleaning products. These holes needed to be filled before commencing the cleaning and sealing processes which I did this on the first day using a flexible grout in a matching shade of cream/brown.

Burnishing a Travertine Tiled floor

To restore the finish on the Travertine I used a process known as burnishing rather than resorting to a form of liquid cleaner which would clean the floor but not restore the appearance. Burnishing involves the use of diamond encrusted pads in varying grits. I began with the coarse pad, and worked my way through the system with medium, fine, and lastly a very Fine pad, using water to lubricate and rinsing the floor after each pad to remove the slurry. This process left the stone exceptionally clean, and with lustre restored to the floor as a whole.

Sealing a Travertine Tiled Floor

Stone floors are porous and overtime they will collect dirt which can become ingrained into the tile and make it very difficult to clean effectively. The solution is to seal the floor and so I returned to the house on the second day to seal the newly cleaned floor. My sealer of choice on this occasion was to apply a single coat of Tile Doctor Colour Grow which is as its name suggests a colour intensifying sealant that provides durable surface protection and enhances the natural shades in the stone.

Travertine Tiled Flooring After Cleaning Kirby Lonsdale Travertine Tiled Flooring After Cleaning Kirby Lonsdale

As you can see from the photographs, the burnishing process made a great difference to the condition of the Travertine tiled flooring, not just in its appearance, but also in terms of its now polished texture.


Professional Travertine Floor Restoration in Cumbria

Travertine Tiled Floor Burnished and Sealed in Kirkby Lonsdale Read More »

Victorian Black and White Tiles Before After cleaning and sealing Windermere

Victorian Black and White Tiles Cleaned and Sealed in Windermere

This job was at a house in near Windermere in South Cumbria, a place which is very popular amongst tourists to the Lake District. My client had a Black and White Victorian tiled floor in dire need of a clean and re-seal.

Victorian Black and White Tiles before cleaning and sealing Windermere

Cleaning a Victorian tiled floor

Prior to the application of any cleaning products, my first task was to run damp tests to make sure there were no inherent damp problems. With old floors of this type it’s good to know if there is a damp problem as this will affect the choice of sealer and also the length of time the floor requires to dry.

Fortunately, there were no damp issues present, and I was able to proceed however had the floor been damp and being December I would have offered to carry out the clean and seal in the Summer, when the water tables were lower and the damp levels would be more settled, thus creating a better environment for the sealer to operate in.

I started cleaning the Victorian tiles with Tile Doctor Remove & Go, a product which breaks down old sealers in preparation for a fresh seal to be applied. The product is diluted with water and then scrubbed into the floor with a scrubbing pad fitted to rotary machine; the resulting slurry is then removed using a wet vacuum.

Next step was to apply Tile Doctor Pro-Clean which was applied liberally to the floor, left to dwell for a short period and then agitated with a black scrubbing pad to lift out the ingrained dirt. I also paid special attention to cleaning the grout lines with a stiff scrubbing brush. The floor was then rinsed with clean water, and the resulting residue was extracted using a wet-vac machine.

Sealing a Victorian tiled floor

After the cleaning was completed, the tiles were left for a couple of days to allow them ample time to dry. Upon my return to the house I checked the damp levels again and then applied two coats of the impregnating, colour enhancing sealer Tile Doctor Colour Grow which gives the black tiles more depth of colour, along with the robust surface seal and Matt finish my client had requested.

Victorian Black and White Tiles after cleaning and sealing Windermere

My client was exceptionally pleased the results – but really, the photographs speak for themselves.


Professional Victorian Floor Restoration in the Lake District

Victorian Black and White Tiles Cleaned and Sealed in Windermere Read More »

Black and White Terrazzo Tiles After Cleaning Windermere

Black and White Terrazzo Tiled Floor Refinished in Windermere

For this job, I paid a visit to the bustling town of Windermere in South Cumbria. My client asked me to refinish a black and white Terrazzo tiled entrance and hallway floor. Terrazzo if you’re not familiar is a very interesting and beautiful stone of Italian origin, which has been used for flooring in houses for centuries.

We had previously quoted to do the work on this floor however the customer has also received a quote from another firm in Glasgow and had chosen to go with them solely because they were more expensive. However, it stands to reason that the most expensive companies are not always the best quality and Tile Doctor prides itself on the amount of customer feedback we display on our websites which we believe is a far better indicator.

On the arranged day no one from the Glasgow firm showed up and after following up with the firm a young man in his early 20s arrived five hours late and began work on the floor. According to the customer he spent three days attempting to complete the job, but ran out of time and asked the client to apply the sealer themselves. The client applied the sealer, but as she had never done it before the floor turned out blotchy in appearance and she was far from happy.

Black and White Terrazzo Tiles Before Cleaning Windermere
To cut a long story short, my client complained to the Glaswegian company, after all she had paid for a full service and not received it. Unable to get a satisfactory conclusion from them she decided to call in Tile Doctor to put the matter right. I must point out that although I have included before and after photos one this post it’s really difficult to appreciate the extent of the problem without seeing the floor in real life.

Re-Applying Sealer to a Terrazzo tile floor

To resolve the sealer, and to provide my client with the polished finish she had originally wanted, I burnished the floor using a set of four Tile Doctor Diamond encrusted burnishing pads. Each of the four pads has a different grit: I first applied the coarse pad and worked my way through medium, fine and eventually very fine using a little water to lubricate and rinsing the floor between each pad to remove any residue; after the burnishing process was complete I gave the entire floor a final, thorough wash.

I then used a wet-vac machine to extract the water and get the floor as dry as possible before leaving for the day and allowing it to fully dry completely overnight, it’s very important that the floor is as moisture free as possible before being sealed as it can affect the final result.

The next day I returned to the house and sealed the floor with two coats of Tile Doctor Colour Grow, an impregnating, colour-enhancing sealer that really accentuates the look of the black and white tiles.

Black and White Terrazzo Tiles After Cleaning Windermere
Now that the problem has been resolved, my client is very happy with the condition of her Terrazzo tiled entrance and hallway floor.

Black and White Terrazzo Tiles After Cleaning Windermere
 

Burnishing and Sealing Black and White Terrazzo tiles in Cumbria

Black and White Terrazzo Tiled Floor Refinished in Windermere Read More »

Flagstone Tiled Floor After Cleaning and Sealing in Ambleside

Flagstone floor maintained in Ambleside, Cumbria

This Flagstone floor was installed in a house near the village of Ambleside and had previously been sealed with varnish and other products which had left the floor looking dull and nowhere near its best. I did a test clean which came out well and then agreed a date and price I came back a couple of weeks later to do the job

Flagstone Tiled Floor Before Cleaning in Ambleside

Cleaning Flagstone Tiles

Due to the numerous coatings that had been applied to the floor it was necessary to completely strip off the coatings back to the bare stone. To start I used Tile Doctor Remove and Go which does what it says on the bottle and removes coatings from tiles, the product was diluted with water and left to soak in before being scrubbed in using a Black Scrubbing pad fitted to a rotary machine. The now dirty cleaning solution was removed using a wet vacuum and I could see that the Remove and Go had removed most but not all of the coatings so it was time to using something stronger. To do this I applied NanoTech UltraClean which is a gel that is left to soak into the floor for thirty minutes before adding water and then agitating with the black pad. The floor was rinsed with water and the solution removed with the wet vacuum. At this point I could see that all the varnish and dirt had been removed so I gave the floor a final wash down with clean water to neutralise the floor before sealing and left for the evening so the floor could dry overnight.

Flagstone Tiled Floor After Cleaning in Ambleside

Sealing a Flagstone Tiled Floor

I came back the next day and tested the floor with a damp meter to confirm the floor was dry and then proceeded to seal the floor with Tile Doctor Seal and Go applied with a paint pad which gave the floor a nice low sheen finish that the customer requested.

Flagstone Tiled Floor After Cleaning and Sealing in Ambleside
 

Flagstone Floor Cleaned and Sealed in Cumbria

Flagstone floor maintained in Ambleside, Cumbria Read More »

Bitumen Cleaned from Victorian Tiles in Barrow in Furness

Bitumen removed from Victorian Tiles in Barrow in Furness

I was asked to take a look at restoring a Victorian Tiled Floor in the Cumbrian town of Barrow in Furness where the floor had been covered in black bitumen; the bitumen was so thick it was difficult to gauge the condition of the floor underneath. I did a test clean which came out well but I had to explain there could be tile damage and other hidden problems so very difficult to quote for however we agreed a date and price and I came back a couple of weeks later to do the job.

Victorian Tiles Covered in Bitumen Barrow in Furness

Removing Bitumen form Victorian Tiles

Removing the bitumen from the floor without damaging the tiles underneath was a slow process involving spraying on a strong solution of Tile Doctor Remove and Go, letting it soak in, applying steam and then carefully scraping off the bitumen. The floor was treated in this manner a small area at a time and a wet vacuum was used to rinse and remove the resulting slurry. This process took up the whole day and was completely successful at removing the bitumen, before finishing I gave the floor a thorough rinse with clean water and used the wet vacuum to dry the floor was much as possible before leaving.

Sealing a Victorian Tiled Floor

I had used a lot of water cleaning the floor so I agreed with the owner to leave the floor for a few days before sealing it so it could thoroughly dry out. When I did return I used Tile Doctor Colour Grow to seal the tiles, the customer had wanted a satin finish but having weighed up the options including the fact that there was a damp problem in the house I felt Colour Grow which is a penetrating and breathable sealer would have the best longevity.

Bitumen Cleaned from Victorian Tiles in Barrow in Furness
The customers were very happy with the results and before leaving we discussed aftercare cleaning, with sealed surfaces you have to be careful not to use acidic products as this can reduce the life of the sealer.

Victorian tiled hallway floor Restored in South Lakes

Bitumen removed from Victorian Tiles in Barrow in Furness Read More »

Varnished Brazilian Slate Tiles Partly Sealed

Varnished Brazilian Slate tiled floor refinished in Barrow-in-Furness

This beautiful Brazilian Slate tiled floor was installed in the kitchen of a house in Barrow-in-Furness, Cumbria; the slate has been previously sealed with a number of products including Varnish and the overall effect was inconsistent making the floor dull and had done little to bring out the true beauty of the natural stone. Additionally varnish is quite brittle and easily scratched by furniture etc. so never a good choice for sealing a floor.

The situation needed to be remedied so during my visit I did a small test to strip off the old sealants, clean the tile and re-seal; the effect was transformational so they booked me to come back in a few weeks’ time to finish the job.

Varnished Brazilian Slate Tiles Before Cleaning

Removing Varnish from slate floor tiles

To transform the floor and guarantee the final appearance its necessary to remove all the previous products applied to the floor stripping it back to its natural state and then seal again. So I got started stripping off the varnish and other sealants from the floor slate using a dilution of Tile Doctor Remove and Go which is a tile friendly product designed to remove coatings from natural stone. The solution is sprayed onto the floor, left to soak in and then agitated using a floor buffer fitted with a black scrubbing pad. The soiled solution is then rinsed away and removed using a wet vacuum.

This process removed most but not all of the varnish and sealers so the next step was to apply NanoTech UltraClean which is a gel that you apply and leave for 30 minutes before adding water and agitating with a scrubbing pad. This did the trick and now not only was the slate clean of all coatings the grout had come up nice and clean as well. The whole floor was given a thorough rinse to remove any trace of product and then dried as much as possible using the wet vacuum to soak up the water.

Varnished Brazilian Slate Tiles Before Cleaning

Sealing Brazilian Slate Tiles

The floor was left to dry off overnight and I returned the next day to seal the tiles checking first with a damp meter to ensure they were no longer damp. All was well so I proceeded to apply the sealer with a paint pad applicator. For this we had agreed on Tile Doctor Seal and Go which is ideal for slate as it really does transform the look of slate and adds a nice satin finish, the Slate was quite porous so five coats were needed in total.

Varnished Brazilian Slate Tiles Partly Sealed Varnished Brazilian Slate Tiles Sealing

I think you will agree the Brazilian slate tiles look much improved; certainly the customer was happy with the results. Before leaving I gave them some advice about aftercare and what products to use when cleaning the floor in future for best results.

Varnished Brazilian Slate Tiles Finished


Brazilian Slate Floor Cleaned and Sealed in Barrow-in-Furness

Varnished Brazilian Slate tiled floor refinished in Barrow-in-Furness Read More »

Sandstone Floor Grange Over Sands After

Sandstone Flagstone Renovation In Grange Over Sands

We received a request to take a look at these Sandstone flagstones at a house in Grange over Sands, the request implied all was required was a usual clean and Re-seal however once we took a look at the floor it was obvious a lot more was involved and the floor was in need of restoration work including Sandstone floor restoration including grout replacement and paint stripping.

Sandstone Floor Grange Over Sands Before Cleaning Sandstone Floor Grange Over Sands Before Cleaning

Cleaning Sandstone

To get the floor clean I decided to apply a strong dilution of Tile Doctor Remove and Go combined 50/50 with NanoTech UltraClean to give it more cleaning power. We normally use Remove and Go to remove old sealers but it works just as well softening up paint splashes so they can be removed. It was left to soak into on the flagstones for a good twenty minutes before being scrubbed into the tiles with a rotary machine fitted with a scrubbing pad. The resultant slurry was removed using a wet vacuum and the floor washed down so we could get an idea of the improvement in the floor. There were quite a few stubborn areas so the whole process was re-done until I was happy the floor was as good as I could get it and at that point rinsed the whole floor down again with clean water to neutralise the floor before dealing with the missing and loose grout which was replaced with a close a colour match as possible before leaving for the evening so the floor could dry overnight.

Sealing a Sandstone Tiled Floor

We came back the next day and tested the floor with a damp meter in a few different locations to make sure no dampness remained in the stone. The sandstone was dry so we proceeded to seal the floor with Tile Doctor Colour Grow which is an impregnating sealer that occupies the pores in the stone preventing contaminates becoming ingrained there and also as its name suggests brings out the colours in the natural stone.

Sandstone Floor Grange Over Sands After Sandstone Floor Grange Over Sands After


Old Sandstone floor Cleaned and Sealed in South Lakes

Sandstone Flagstone Renovation In Grange Over Sands Read More »

Victorian Tiled Floor Windermere After Cleaning

Victorian Tiled Hallway Cleaned and Sealed in Windermere

I recently paid a visit to Windermere in the Lake District to clean and re-seal a Victorian Tiled hallway floor. The customer wanted the shine putting back on the Victorian tile and some tile grout had become loose and needed replacing.

Victorian Tiled Floor Windermere Before Cleaning Victorian Tiled Floor Windermere Before Cleaning

Cleaning Victorian Floor Tiles

On arrival I set up my tools and covered any areas that needed protecting against water. Once that was done I started to strip the floor of any remaining sealer using Tile Doctor Remove and Go which is a coatings and sealer remover product that is safe to use on tile, stone and grout. Working in small areas the product was scrubbed into the tile and then washed it off with water using a wet vacuum to remove the soiled solution. This process was repeated until the whole floor was clean, there were a few stubborn areas and for these I mixed the Remove and Go 50/50 with Nano Tech Ultra Clean which adds tiny abrasive particles into the solution to make a more effective product. The process of scrubbing the floor made me realise that the loose grout problem was greater than first thought and some tiles need re-laying so I decided to come back and do this the next day, before leaving however I gave the floor a thorough rinse to ensure any trace of cleaning product was removed.

Grouting Victorian Tile

The next day I arrived and fixed all the loose tiles, my preference is to use the Mapei range of tile adhesives and grout, in fact the grout comes in a range of colours which is very useful if your filling in holes in travertine etc. One the adhesive had gone off I began to grout them in including those areas where the grout was missing or become loose. The last step was to wash off the grout from the tile surface and making sure it was all tidy for the next day.

Victorian Tiled Floor Windermere During Cleaning

Sealing Victorian Floor Tiles

On the third day I returned to the house and after verifying the floor was dry with a damp tester and the grout had hardened I started sealing the floor with Tile Doctor Seal and Go putting on thin coats which took about twenty minutes to dry, in total seven coats were applied which gave the floor the nice shine the customer was after.

Victorian Tiled Floor Windermere After Cleaning Victorian Tiled Floor Windermere After Cleaning

This job took me three days in total and after I had finished we discussed how to maintain the appearance and increase the longevity of the sealer by using a Neutral Cleaning product which unlike many acidic cleaners does not eat away at the sealer.

NB..Reproduction Victorian Tiles can be difficult to source so if you’re looking for replacements contact www.KendalTileandStone.co.uk who stock a good range.

Cleaning and Sealing Victorian Tiles in Cumbria

Victorian Tiled Hallway Cleaned and Sealed in Windermere Read More »

Quarry Tile Cleaning Kendal Before After

Quarry Tile Cleaning in Kendal Utility Room

A customer from Kendal (famous for its Kendal Mintcake) called me in to look at their Quarry Tiled Utility floor, which was looking very dirty and stained. On inspection the sealer had broken down and was no longer protecting the tile resulting in dirt getting ingrained into the pores of the tile resulting in discolouration. We agreed what short of finish was required and the customer booked me in to do the work.

Quarry Tile Cleaning Kendal Before

Cleaning Quarry Floor Tiles

My first job was to protect the surrounding areas from splashes so on my arrival I covered the wooden floor in the hallway before starting to remove the old sealer with Tile Doctor Remove and Go, I sprayed it on working in small areas leaving it to dwell for a while before scrubbing it in with a stiff brush making sure I scrubbed it in well before removing the soiled solution with a wet vacuum. I scrubbed all the grout joints at this point to make sure they were all clean and then washed the floor down to remove any chemical and neutralise the floor. It was a relatively small floor so I left it to dry and returned a few house later to seal it.

Quarry Tile Sealing Kendal

Sealing Quarry Floor Tiles

On my return I used a damp tester to make sure the floor was dry, which it was, so I sealed it with two coats of Tile Doctor Colour Grow which is a as well as protecting the floor brings the natural colours out in the tile. Naturally if the damp tester had showed that it was damp I would not have sealed the floor that day as the sealer would not have taken properly.

Quarry Tile Cleaning Kendal After
This job took me one day as it was only a very small floor and I was able to seal it in the same day the customer were happy with the result I went through the maintenance program and explained how to clean the floor.

To source Quarry tiles similar to these visit www.KendalTileandStone.co.uk

Restoration of Quarry Tiles in Kendal

Quarry Tile Cleaning in Kendal Utility Room Read More »

Slate Tile Floor Cleaning Before After

Cleaning and Sealing Slate Tiles in Windermere

A Kendal Tiles customer from Windermere called me in to take a look at their Multi Coloured Chinese Slate tiled kitchen floor which was looking very dirty with ingrained stains and marks on the stone from spills etc. that were proving difficult for the customer to clean. The brief was to give the floor a deep clean, remove the stains and make it easier for them to maintain thereafter. On inspection I could see the sealer had broken down, which is why the slate was getting stained and hard to clean. I did a test area on the slate and grout to show them how it could look and it came up really well so the signed my Work survey form and booked me in to do the work.

Slate Tile Floor Cleaning Before Slate Tile Floor Cleaning Before

Cleaning Slate Floor Tiles

On my arrival I covered the wood and carpet in the kitchen and hallway to protect it then started on removing what was left of the old sealer with Tile Doctor Remove and Go; I sprayed it on working in small areas and activated it with a brush making sure I scrubbed well around the areas of slate that are risen as in this slate its uneven and then washed it off using a wet vacuum to remove the soiled solution. It was very satisfying to watch the tiles come back to life with bright colours, I kept at it all day until all the Slate tiles were clean and the sealer was fully removed, I then scrubbed all the grout joints to make sure they were all clean then I washed all the floor down before I left ready for sealing the next day.

Sealing Slate Floor Tiles

The next day I sealed the floor with Tile Doctor Seal and Go to protect and enhance the tile putting on five coats before it was fully sealed. I used an industrial air blower to help it dry quicker as the house owner had a dog and I did not want any paw prints in my work. Below is a photograph of the end results in which you can see the natural colours have come back to life.

Slate Tile Floor Cleaning After
This job took me two days and the owner was extremely happy with the result, I also spent time to explain a maintenance program discussing how to clean the floor with Tile Doctor Neutral Tile Cleaner which has a low PH and not an off the shelf supermarket cleaner which being mildly acidic can break down the sealer and reduce its life.

To Buy These Multi Coloured Chinese Slate tiles contact Kendal Tile and Stone.

Restoration of Slate Floor in Windermere

Cleaning and Sealing Slate Tiles in Windermere Read More »

Textured Porcelain Tile with Charcoal Grey Grout in Kendal

Changing the Grout Colour used on Porcelain tiles in Kendal

A customer in Kendal requested that the colour of grout installed on 20m2 newly laid textured Porcelain tile floor was changed; the tiler had used a Sandstone coloured grout and they were not happy with the colour or the grouting in general which looked patchy. I recommended the use of an epoxy Grout Colouring product that re-colours, seals and rejuvenates existing grout joints and comes in twelve different colours and after showing the customer the different colour options they picked Charcoal Grey.

Textured Porcelain Tile with Limestone Grout in Kendal

Applying Grout Colourant

I did a test area so they could see how it might look under the lights which went well and so I started to apply the grout colouring to the whole kitchen floor completing small areas until the entire floor was covered and taking care not to get any on the Porcelain tile as the textured surface makes it difficult to remove and requires the use of an white abrasive scouring pad. Normally you have to use a Pre-Treater product on the grout before Grout Colouring however this grout was new and so this step was unnecessary.

Textured Porcelain Tile with Charcoal Grey Grout in Kendal Textured Porcelain Tile with Charcoal Grey Grout in Kendal

This job took me one day and only required one tube of Grout Colourant. The owner was extremely happy with the result will now have a fairly maintenance free tiled floor as Porcelain tiles are very hard wearing and the epoxy grout colourant acts as a barrier and therefore unlikely to discolour.

To source similar Quarry tiles visit www.KendalTileandStone.co.uk

Changing the colour of grout in Kendal

Changing the Grout Colour used on Porcelain tiles in Kendal Read More »

Slate Floor in Ulveston Before After Cleaning

Cleaning and Sealing Slate Tiles in Ulveston

This property in Ulveston had previously been used as a guest house and was now being refurbished and turned back into a home. The kitchen and conservatory had a Slate tiled floor and as you can imagine had seen a fair amount of wear from the numerous fried breakfasts that had been prepared in there. The owners had decided to replace the kitchen but were keen to keep the slate floor however it was in a bad state and looked as if it had never been cleaned and sealed for some time.

I did a small test using Tile Doctor Remove and Go (which you can see in the photograph below) and it came up really well, naturally we were booked to come back and finish the rest of the floor which I had estimated would take two days.

Slate Floor in Ulveston Test Area Slate Floor in Ulveston Test Area

Cleaning Slate Floor Tiles

Two weeks later I turned up at 9am as agreed and set up my equipment, the kitchen had already been removed so with the exception on the cooker little preparation was required. I worked in small areas using a high pressure spinner tool to remove as much dirt off the tiles as possible and a wet vacuum to remove the soiled water.

Slate Floor in Ulveston Before Cleaning Slate Floor in Ulveston Before Cleaning

Stubborn areas were treated with Remove and Go and then I moved onto the next job which was to clean up the grout. For this I used a strong dilution of Tile Doctor Pro-Clean which is a alkaline tile and grout cleaner that is safe to use on natural stone. It was scrubbed in using a stiff brush and then rinsed off with clean water, again using the wet vacuum to remove the soiled solution. The floor was now clean but still damp so I tidied up my tools and left for the day.

Slate Floor in Ulveston After Cleaning Slate Floor in Ulveston After Cleaning

Sealing Slate Floor Tiles

The Next day I came back and inspected the floor to ensure it was dry and that I hadn’t missed anything. All was well so I started to seal the floor with five thin coats of Tile Doctor Seal and Go which is an ideal sealer for slate as it adds a nice subtle sheen to the tile and being water based there is no smell as it dries. The sealer was applied using a paint pad applicator and each coat took around about twenty minutes to dry.

Slate Floor in Ulveston After Sealing Slate Floor in Ulveston After Sealing

When it was complete and the floor had dried I packed up my equipment and spent some time talking to the customer to check they were happy with the results (they were very happy) and to advise them on how to maintain the floor using with a neutral tile cleaner going forward which will help extend the life of the sealer.

To source slate tiles similar to these visit www.PremierTilesBarrow.co.uk

Multi-coloured Chinese Slate Floor Cleaning in South Cumbria

Cleaning and Sealing Slate Tiles in Ulveston Read More »

Scroll to Top